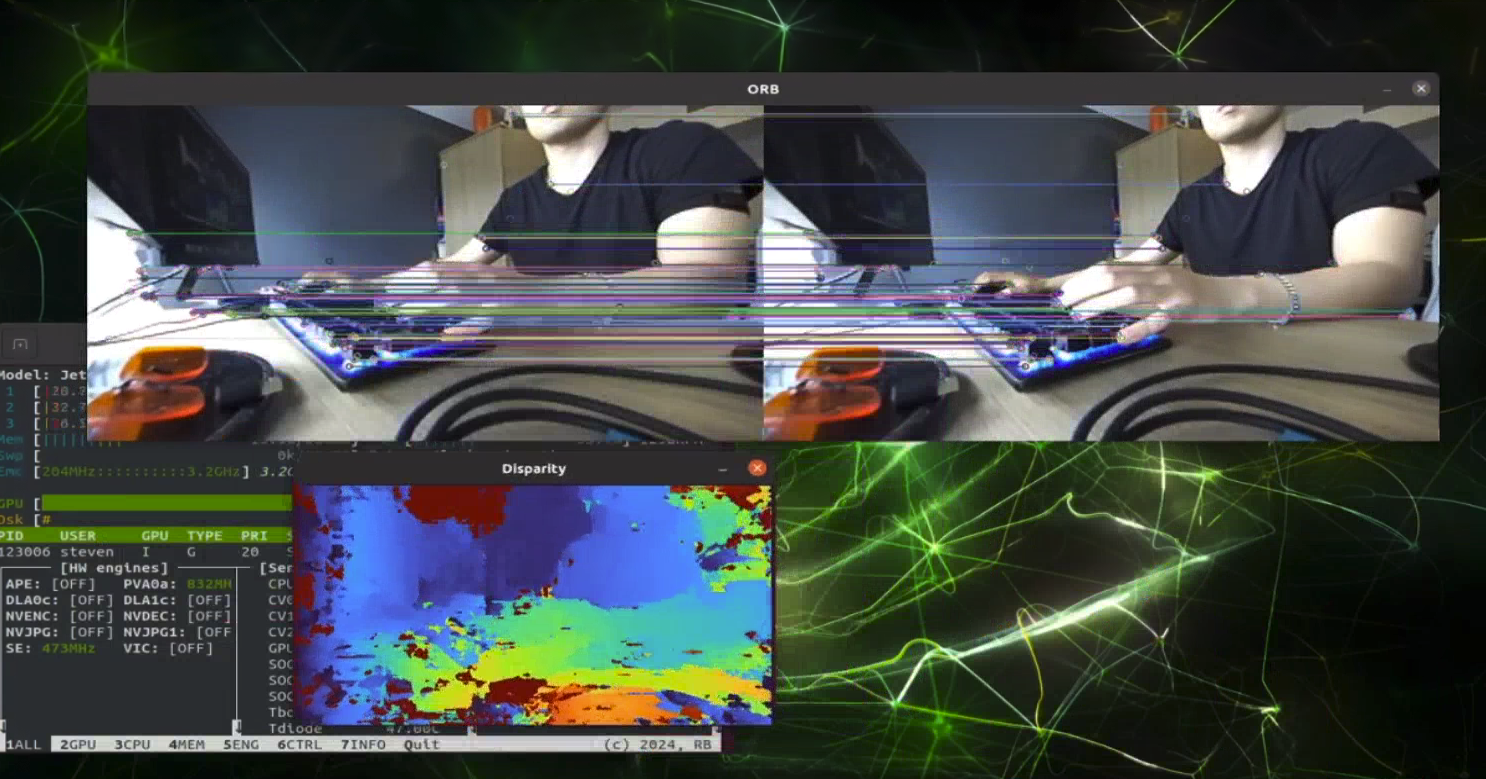
VR Headset Logs
The goal is to rebuild Apple’s vision pro.
Repository where I’m writing the code:
Some major ideas that idea that enables modern SLAM systems:
- Use of Keyframes as opposed to processing every single new frame
- Graph Optimization
Why this problem is hard:
- Rotation can be mistaken for translation
- Noisy sensor measurements
Easy things that are kind of hard implementing:
- Pangolin: keeping the screen fixed in the background
- How to implement maps, map points, and association with keyframes
- Each keyframe stores its feature points, and then try to associate with map points
- We don’t immediately discard non associated keyframes, since it might be a keyframe
- Why don’t we decide whether it is a keyframe at the beginning? We decide if it is at the end. Because first, we need to do track. So we don’t create duplicate map points, that actually refer to the same points.
- synchronizing keyframes with frames
- When keyframes get shifted, we need these frames to shift as well. So use the frames relative to the previous keyframe
- store the stamp, so that they are synchronized
- or store the index? Storing the index makes reasoning a bit easier
- Alignment of 2d measurements and 3d landmark positions in data structure
- Computing mean viewing angle
- Matching map point descriptors, or previous frame descriptors?
- Using numpy arrays as opposed to list comprehension anywhere to make lookup faster
- How to get bundle adjustment working correctly…
I’m working on this to figure out hard problems.
PTAM paper mentions why SLAM is hard.
Some resources that you can take for inspiration
See VR Headset Script for the script to the video. This is going to be the engineering document for everything.
Good Videos for inspiration:
Design choice:
- Anything that isn’t owned by you is read-only
What I don’t like about the C++ codebase:
- Some things are updated in the return value, some things are updated in the function call argument. It is not consistent and I hate that
- I guess everything VPI is returned, and everything non-VPI is updated in the argument
2024-05-28
exploring whether its issues of numerical instability The landmarks seem to be correct in place.
I think my bundle adjustment is fine now. But I need more vertices.
num vertices: 53
num edges: 163
Done optimization
Before:  [[0.876 0.343 -0.340 1.314]
 [0.482 -0.587 0.651 0.849]
 [0.023 -0.734 -0.679 1.519]
- This is not enough vertices and edges it seems
The other bug I found is that if you expand the search, and try to find a match point to match to, you might fill the frame with other map points that are duplicates.
I added a set to filter out this logic, but its still not working?? It’s because i need to add it in 2 places…
Insight:
- If you use less map points, you get more correct visual odometry, at the expense of really bad backend code
Track correct map points over time is super important.
I think its hard when there’s rotation. And then, you suddenly lose lots of map points that are tracked rapidly. And so your bundle adjustment is not going to work properly.
The decision with map points is also more complicated than it actually seems. Map points are culled through a process where they look at if this map point is actually seen in the keyframe.
2024-05-27
There’s this funny line lol: https://www.reddit.com/r/computervision/comments/mu3fmh/orbslam2_for_python3/
I realized I probably did something incorrectly when it came to matching the descriptors.
- I match the descriptors of the current frame. So the descriptors can slowly drift. I need to use the original descriptors right, on the map point?
I feel like I am doing some really ugly logic with the way I am adding keyframes.
After I have a refined pose estimate, I need to run bundle adjustment to correct it.
I dont know why my bundle adjustment isn’t working. Minimizing reprojection error works. And we get a correct pose estimate. The matchings are correct. I checked that the 3d measurements of the points line up, and indeed they do.
ahhhh I forgot python copies are shallow copies. This might have messed up things.
The size is 31.0.
2024-05-26
Been going at it the past 2 days implementing this mapping stuff. I absolutely need to finish tonight. The issue is that when there aren’t a lot of points being tracked.
I’m trying to insert keyframes more often, since there doesn’t seem to be enough points that are being tracked.
Trying a few keyframe insertion criterias.
2024-05-24
I need the map synchronization.
2024-05-23
Steps to do:
- Detect features
- Use the motion model to get camera initial pose estimate
- Project map points onto image frame
- Do feature matching between map points and image,
- Solve through minimizing the reprojection error
- feed this to mapping?
2024-05-22
Debugging with KJ, I had this transform inverted…
2024-05-19
To render the background video, we fix the video on a plane at a fixed depth very far behind.
We need to calculate where this video is, based on the position of the camera.
It seems that Pangolin is using optical frame for its camera…
but it still doesn’t explain why there was so much jumping.
Umm, I guess i used model view at, which took care of this conversion to optical frame…
- Pangolin uses a right-handed coordinate system with the camera looking along the negative Z-axis by default, the X-axis pointing to the right, and the Y-axis pointing up.
IM SO CNOFUSED ABOUT THE AXES
- the pango camera for the model view matrix has a transform from world canonical to camera optical
red = x green = y blue = z*
The camera motion is still too jumpy. I need to figure out a way to tune out this noise.
- how?
You can average the pose positions.
Instead of minimizing the reprojection error, you can try just using IMU. And then using a kalman filter?
2024-05-18
Also some issues with multiprocessing…
https://community.stereolabs.com/t/python-multiprocessing-bug-fix/4310/6
Today has been a tedious day of trying to figure out why Pangolin isn’t working.
from frontend import VisualOdometry- this line of code breaks it
Basically, importing numpy first helps fix the issue. However, other imports break it again.
If I import GLUT and create a window first, then try to create a Pango window, it works (hot start), but cold starting doesn’t work.
hmm, the culprit seems to be matplotlib, if I try to import matplotlib, it messes with the pangolin setup
import matplotlib.pyplot as plt
- So I will remove this
Alright, turns out that importing pyzed also messes with pangolin…
2024-05-17
Things to do:
- Add windowed tracking edge constraints
- Run it real-time on the jetson
- Probs not good enough, so add the IMU
Umm so I added the windowed tracking, hoping that it would do better, but I don’t think it is doing better.
I built the original g2o repo, on the pymem branch, and it worked! The bindings work.
- Umm nooo, I was only able to import it, but there is nothing
So I reset the original cmake. It was just linking incorrectly
steven@steven:~/VR-Headset-From-Scratch/vSLAM-py/g2o-python$ find /home -name libg2o_solver_cholmod.so.2.1
/home/steven/.local/lib/libg2o_solver_cholmod.so.2.1
steven@steven:~/VR-Headset-From-Scratch/vSLAM-py/g2o-python$
So I needed to add it to path
export LD_LIBRARY_PATH=/home/steven/.local/lib:$LD_LIBRARY_PATH
2024-05-16
Fundamental learning today: we must optimize over multiple landmarks, and not just a single one. So when you track, you should track it across those multiple time frames.
From ORB, seems like they used a window of 10-20 (according to ChatGPT).
1-10 10-20
2024-05-11
Today seems like just a figure out the build issues day. But I’m not working enough. Also, I need to get into the mindset that my day starts at 9am, and it finishes at 5pm.
- Else, I just become very lazy during the mornings and afternoons
I had this talk with Dave, and he agrees.
Alright, I really need to figure out how to install g2o. I’m disabling certain solvers for the python to build
- Disabled Cholmod
- Disable CSparse
Installing Pangolin
It’s still not building. I need to figure out the other error message.
I’m trying to install pangolin, and it’s just not working.
- pyopengl-accelerate
I’m removing that from the requires in the CMAKE. hopefully, that will fix things. At least on the mac side.
- yesss, actually it’s not even required, I don’t know how that is used by the wheel
I keep making dumb decisions, and then things just stop working.
I think the reason I had used Pyenv was because i installed OpenCV with CUDA, and then installing was a pain, because I had these bindings. But now, I have these 2 other things I need to download:
- Pangolin
- g2o
And dependencies / versioning makes this such a pain.
I had this issue with Pangolin installing on my jetson, needed to set python in my cmake
set(PYTHON_EXECUTABLE "/usr/bin/python3")- NO, this doesn’t fix it
So I just had to build it from source?
- I don’t remember how I fixed the pangolin issue anymore…
No, I have to directly use the command:
cmake -DPython_EXECUTABLE=/usr/bin/python3 -B build -GNinja
cmake --build build -t pypangolin_pip_install
2024-05-09
This is actually so annoying. I implemnted bundle adjusmetn on the frontend, however it’s still not very accurate. I think I might as well just use IMU.
I mean, the reason it’s not that good, is that it’s only using images at time t and t-1.
- You need to make proper use of the bundle adjustment problem
But the bigger issue is, how do you connect the frontend to the backend?
2024-05-08
Wow, already been a week. We are wednesday today. Spent the last couple of days trying to learn BA.
First, I need to fix up my visual odometry implementation. Monocular visual odometry works fine, they calculate 2D-2D essential matrix. I’m going to be doing 2D-3D.
For now, using Zed’s depth module, because the disparity computed is really bad??
Something really cool I learned: Why would you use 2D-3D when you can use 3D-3D?
- in 3D-3D, there are so many more features. You definitely get better accuracy, but it’s a lot slower then 3D-2D approach. Although one can argue that ICP, hardware-accelerated, isn’t so bad.
Actually, that’s not 100% true right?? Like you’re only doing 3D-3D with the features that you are detecting. Is ICP that slow?
Okay, i think i get it! This is for the vertex point
vp = g2o.VertexSBAPointXYZ()
You will add it to an edge
we have (u,v, 1) = KP
Something fishy is going on. I feel that something is wrong with my reprojections
2024-05-01
Alright, I changed my mind.
I still want to write SLAM from scratch. I think a lot of the epipolar geometry stuff is cool, and I’m going to learn the entire book. This time, I am revisiting the book with a better high-level understanding of every single concept.
2024-04-29
Doesn’t run fast enough
SLAM + IMU → Kalman Filter → Fused inertial data
2024-04-28
I feel kind of discouraged. The whole reason I wanted to do this project was because I wanted to learn how to do SLAM from scratch. But that thing is literally so complicated. There are so many things I need to do.
- But if I use an open-source implementation, I feel like I am cheating my viewers. And I’m not really implementing it.
Is there any project, I can even write from scratch??
Like you actually need to find a good use case.
I am seriously considering just using ORB-SLAM3 in ROS2. Will make life a lot easier.
Then, just use ZED and publish the camera feed. Or even better, just use the ZED SLAM stuff.
And then, you get the transforms, and you can just focus on rendering the GUI.
- ROS2 under the hood is fine.
But then, how am I going to do a technical deep dive?
- Like I want the karpathy style videos. I guess ROS2.
Maybe I spend 2 days just building ROS2 from scratch. And then, I can just use ROS.
“A lightweight implementation of ROS2”. They use the middleware.
Same way Karpathy just
2024-04-05
So, I don’t understand how my implementation is different from the reference one for computer vision. Like they look the same to me.
I checked, the images are the same
- I checked the shape, there was an extra 3 dimensions because it wasn’t a grayscale image. It’s really annoying, I can’t figure out the exact issue
I was comparing keypoints and seeing that the hashes are different, which made me think that the ORB is not working the same.
- But it seems that the hashes are merely memory addresses
The hashes you see in the representation of cv2.KeyPoint objects, such as <cv2.KeyPoint 0x106119b60>, are memory addresses in hexadecimal notation
So I sanity check that the ORB detections are the same. What about tracking? Because that is where i saw different dimensions??
- The problem just magically disappeared, I actually have no idea what happened
I just printed things out, I didn’t change anything.
The reason the path is messed up is because of the big matrix multiplication that is happening.
So 3000 ORB features gives much better results. We finally have a baseline!!
- The reason of the poses not working well is because I tried to play around with slightly different pose matrices. But yea, increasing the number of ORB features helped
2024-03-28
Alright, today, need to make some major design decisions to figure out what is really needed.
You need to be really careful about the abstractions you make. Abstractions are useful for readiability and reusebility. You can create an abstract Camera class that can be both a dataset and a real-time camera. The thing is, cv2 already does that. So you can wrap around it, but do you really need to make that abstraction?
- You need for example the camera to store calibration data. You should check if cv2 videoCapture is able to store that. Don’t create unnecessary abstractions
I’m having this internal debate about readability: If you have this one big function, it gets exhausting to read from time to time, and I wish there were abstractions to simply the understanding process. However, on the flip side, if you have all these abstractions, you’re constantly jumping around, and you don’t get the see the implementation details.
So only abstract away the things that need to be abstracted away. Don’t abstract away 1 line of code (because that actually doesn’t abstract away anyhting), but if there is a block of code that has higher level logic, you should abstract it away.
I’ve been thinking about how they designed cv2.VideoCapture, since that doesn’t require any form of camera calibration. And it makes sense for multiple reasons: the video that is fed through cv2 doesn’t have any information, it might already be rectified for all you know. So you don’t really need to apply any form of calibration.
Algorithm should be decoupled from the dataset. I don’t agree with the design decision here.
- Algorithm should be decoupled from the input type
From a readability point of view, I actually really like how well this guy decomposes the different function calls.
- it’s like a very good way to decompose
- like functions aren’t that long. I guess it’s Clean Code
    def get_pose(self, i):
        """
        Calculates the transformation matrix for the i'th frame

        Parameters
        ----------
        i (int): Frame index

        Returns
        -------
        transformation_matrix (ndarray): The transformation matrix. Shape (4,4)
        """
        # Get the i-1'th image and i'th image
        img1_l, img2_l = self.images_l[i - 1:i + 1]

        # Get teh tiled keypoints
        kp1_l = self.get_tiled_keypoints(img1_l, 10, 20)

        # Track the keypoints
        tp1_l, tp2_l = self.track_keypoints(img1_l, img2_l, kp1_l)

        # Calculate the disparitie
        self.disparities.append(np.divide(self.disparity.compute(img2_l, self.images_r[i]).astype(np.float32), 16))

        # Calculate the right keypoints
        tp1_l, tp1_r, tp2_l, tp2_r = self.calculate_right_qs(tp1_l, tp2_l, self.disparities[i - 1], self.disparities[i])

        # Calculate the 3D points
        Q1, Q2 = self.calc_3d(tp1_l, tp1_r, tp2_l, tp2_r)

        # Estimate the transformation matrix
        transformation_matrix = self.estimate_pose(tp1_l, tp2_l, Q1, Q2)
        return transformation_matrix
From my Clean Code notes:
- Small: Functions should be around a maximum of 20 lines. If the function is too long, break it down into smaller functions.
Do one thing: Functions should do one thing. They should do it well. They should do it only.
- *(not sure about this) Prefer fewer arguments: The ideal number of arguments for a function is zero. More than 3 arguments require very special justification, and then shouldn’t be used anyways.
When a function seems to need more than 2 or 3 arguments, it is likely some of those arguments ought to be wrapped into a class of their own. Consider the following 2 examples:
Circle make_circle(double x, double y, double radius);
Circle make_circle(Point center, double radius);
But I also see the flip side. Where you just have so many abstractions for no reason. But I don’t think I will run into this.
So one of the big things that I learned today is that everything within a given function should be at the same layer of abstraction (Stepdown Rule). The actual hardware implementation is lower level. That should be abstracted away. I think Tinygrad should be worthwhile to look into to have good code.
At the end of the day, your code has a certain complexity. If you abstract it away, you make it easier to understand for those that simply want to operate at a higher level of abstract. But for lower levels of abstractions, you give that option. As opposed to have everything at a lower level of abstraction (you get less files, and a small performance boost) → much closer to monolithic architecture,
- pros: Readibility. I thought my code was more readable by having everything in 1 big function call, until I saw someone abstract things away for me.
- I guess I just hate jumping through 5 different function calls to get to what I need to change, and it’s just stupid (discussion I had with Clayton). If it’s not intuitive, then it’s probably that the abstractions aren’t done correctly.
- If you feel that it’s a function call after another, without adding anything beyond just reusing code, then it’s probably bad design
The whole reason was that I wanted to be able to reason about types. But actually, I don’t think that’s a good approach. If you favor reasoning through types, you actually restrict your think about the bigger picture.
2024-03-25
Spoke with Kajanan today as I felt stuck.
Some repos to look at:
This one I found on my own
I want the repo to be really to use for people. So they need to be able to just run it with an example dataset.
Oh yes, it should be like this:
2024-03-24
Need to look at this:
I found this repo which is all in python, and seems pretty good: https://github.com/luigifreda/pyslam
So in their case, they use the Fundamental Matrix to calculate and .
It uses G2o on the backend for pose-graph optimization.
2024-03-21
Today, I spent the entire day porting my C++ code to Python. I think I talked about this yesterday, but I find C++ too restrictive sometimes. I need to flexibility to run whatever optimization I need. Also, the ability to just see the variables is something that is much more complicated.
Also, since Python is calling C++ under the hood for OpenCV, or whatever other libraries, like the bottleneck is not Python. It’s the actually image processing library. Also, I want others to use this codebase, so if it’s in C++, there’s a much bigger barrier to entry.
And even if you did it in C++, you didn’t really do it from scratch. Because you are using the VPI library. You’re just making your life harder for no reason.
I built OpenCV With CUDA from source
- I didn’t do it in C++ because building from source seemed super annoying
However, I know that OpenCV is much more popular. Now that I am in Python, I can reconsider doing CPU only implementations
- This made me think about why is alll Steve Macenski implementations CPU-only? I guess that’s why he opts for C++, because there performance actually matters. Whereas I am using Python, which calls various GPU kernels under the hood
Keypoints is just an list of a cv2.keypoint Descriptors is just a np.array of shape(num_keypoints, 32) with a dtype = uint8
array([[ 10,  32, 214, ..., 136, 107, 129],
       [182, 143,  72, ..., 252, 218,   4],
       [ 39, 107,  76, ...,  59, 235, 132],
       ...,
       [ 56, 141,  82, ..., 170, 252, 138],
       [  6, 205,  50, ...,  31,  61, 135],
       [ 18, 141,  46, ...,  70, 175, 223]], dtype=uint8)
However, I am trying the same with VPI, and it’s this
array([([197, 229, 180,  71, 116,  26, 101, 188, 105,  25, 239,  80, 183, 178, 133, 255, 117, 102,  46,  72, 198,  26,  77,  97,  46, 203, 101,  16, 154, 163, 217,   5],),
       ([144, 129, 150, 213,  44, 200,  64, 118, 196,  24, 129,  64, 183, 243, 216,  34,  97, 200, 124,  58,  75,  33, 147,  12, 129, 140, 176,  92, 176, 136, 114,  32],)],
      dtype=[('data', 'u1', (32,))])
- fixed by getting the data
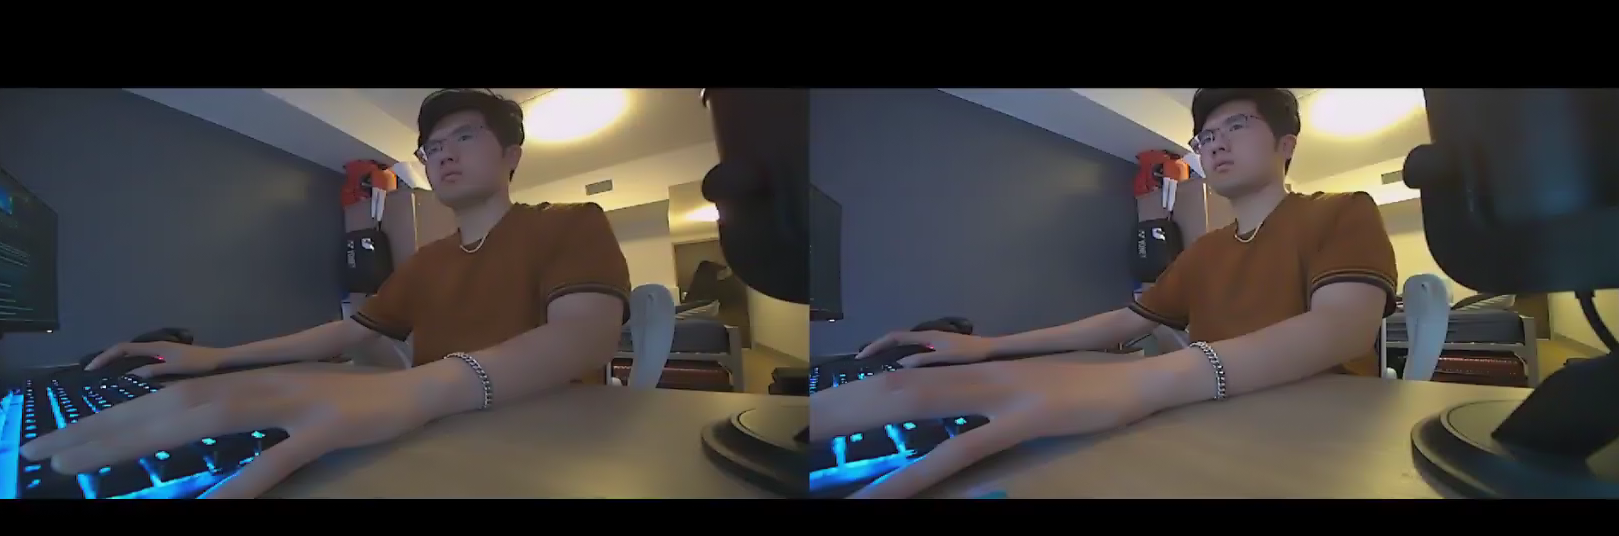
I’ve been spending some time trying to get disparity to run fast and correctly. My C++ implementation of the disparity vs. Python produces different results..??
fckn rookie mistake of converting colors due tot his that i copy pasted. it was actually fine
# Converts to RGB for output with PIL.
disparityColor = cv2.cvtColor(disparityColor, cv2.COLOR_BGR2RGB)
2024-03-20
Going to switch over to python to reduce the time it takes to build the actual project.
Use https://github.com/hahnec/torchimize.
I ported over the cuda kernel from C++ to Python https://thedatafrog.com/en/articles/cuda-kernel-python/
2024-02-17
Alright, so I failed my CS341 exam but it is okay. I need to focus on finishing school. Finish my passion project. Feel happy.
So back on the grind. I need to finish this SLAM stuff. The VPI holds an array of objects.
I feel like I am setting myself to shoot myself in the foot with the way I am organizing the ORB → Matcher. Because they draw the features on the image. I need to take contiguous features. I think the easiest is to just use a CPU matcher in opencv?
The reason the ORB is getting complicated:
- You need an ORB image at 2 consecutive time steps. You only have ORB to allocate memory for one time step. So if you use a queue to reference two consecutive images, that is nothing to work.
The issue with having this functional sort of programming is that there are just so many things that are being passed around. If you just look at a ORB detection, its the output image, the descriptors, and the keypoints already. All of that needs to be handled, it’s a lot of work.
TODO:
- Figure out why the queue doesn’t get filled even though the processing loop is much slower (subscriber much slower than publisher) → Because the display loop runs that fast
As for the queue being empty even though the main thread is slower, its probably due to the display thread running much faster, and being able to empty to queue. The ORB and disparity thread cannot run it as fast. Only the display thread takes care of emptying the queue.
The issue that I am running into while combining ORB and Matcher:
- Matcher runs at t and t-1, ORB only runs at t
We need to store a copy of the keypoints and descriptors at t-1 so that it can be used. The question is, how do we do that exactly?
Because we have streams. So we actually need to make 2 ORB calls, or what? I am confused, this is difficult
There are many ways.
I have a segmentation fault with this. My hypothesis is due to the two descriptors actually pointing to the same memory block. So I need to get it to point to another memory block.
I ended with spawning two instances of orb. One of , and one for . This is more in line with what the VPI guidelines are, to avoid extra copy operations and optimize under the hood. Easier for synchronization too. Makes use of more shared memory.
So instead of
std::deque<cv::Mat> cv_img_t;
std::deque<std::vector<cv::KeyPoint>> cvkeypoints_t;
std::deque<VPIArray> descriptors_t;
We simply have
// t and t-1 features
std::vector<cv::KeyPoint> cvkeypoints;
cv::Mat cv_img_t_1;
cv::Mat cv_img_t;
VPIArray descriptors_t;
VPIArray descriptors_t_1;
std::vector<cv::KeyPoint> cvkeypoints_t_1;
std::vector<cv::KeyPoint> cvkeypoints_t;- These are declared inline and by reference
Have a segmentation fault because I was returning a reference??
- Yupp,
- very cool!!
There’s a parameter that I need to look into.
The thing is, i need to pop 2 images from the queue. But multiple threads need to pop 2 images from the queue. Do i create a queue for each thread then?
Having those issues made me appreciate the beauty of ROS. Queues at the basis of everything. I am looking into a bunch of articles with the hopes of trying to understand how ROS is built.
2024-02-12
Alright, so I have 3 threads running simultaneously, so there are no blocking calls
- 1 for display
- 1 for ORB
- 1 for disparity estimation
However, the ORB and disparity need to be synchronized afterwards.
Today, I need to learn how the thread function actually works. Things like
I need to understand why when I use the queue, the orb thread and the disparity thread are still up to sync it seems. Also I am popping in 2 different areas.
2024-02-11
There seems to be an issue with the way the ZED X mini is being detected over GMSL. It uses the incorrect serial number. The one that it downloads is inocrrect. So I need to copy over the calibration file that is located in /usr/local/zed/settings.
Getting the actual calibration values can be done here:
The serial number is 54716783 for the Zed X Mini, but when I actually print out the serial number in C++, it’s not that
One issue that I need to figure out is how to get this display showing up to the monitor as quickly as possible. The ZED Explorer is great at this
Running the nomachine slows down the jetson a TON. It eats up all that CPU time. I previously observed that with the F1TENTH, but this one, just showing a camera feed slows it down. I thought it was an OBS issue, but I noticed that my first recording was u
I found this tutorial:
Trying his repo, a few extra things I need to install
sudo apt install pkg-config ffmpeg xrandr-dev libavfilter-dev libavdevice-dev
Turns out, the bottleneck was due to having
init_params.depth_mode = sl::DEPTH_MODE::ULTRA;- This ate up quite some compute, I turned it off and it was a lot more smooth. In the preview, they didn’t use the depth view, which explains why this is a lot smoother
Turning it off
init_params.depth_mode = sl::DEPTH_MODE::NONE;Alright, I think there is some limitation to what I am doing here:
__global__ void ComputeDisparityToDepthCUDA(float* disparity_map, float* depth_map, int width,
                                            int height, float fx, float baseline) {
  int col = blockDim.x * blockIdx.x + threadIdx.x;
  int row = blockDim.y * blockIdx.y + threadIdx.y;
  if (col < width && row < height) {
    int idx = row * width + col;
    depth_map[idx] = fx * baseline / disparity_map[idx];
  }
}
Specifically, I need to consider 2 cases:
- When the disparity is 0, division gives infinity?
- When the disparity cannot be calculated for a given pixel, what value does it return?
Ahh, it’s because I actually masked it previously
// When pixel confidence is 0, its color in the disparity
// output is black.
cv::Mat cv_mask;
cv::threshold(cv_confidence, cv_mask, 1, 255, cv::THRESH_BINARY);
cv::cvtColor(cv_mask, cv_mask, cv::COLOR_GRAY2BGR);
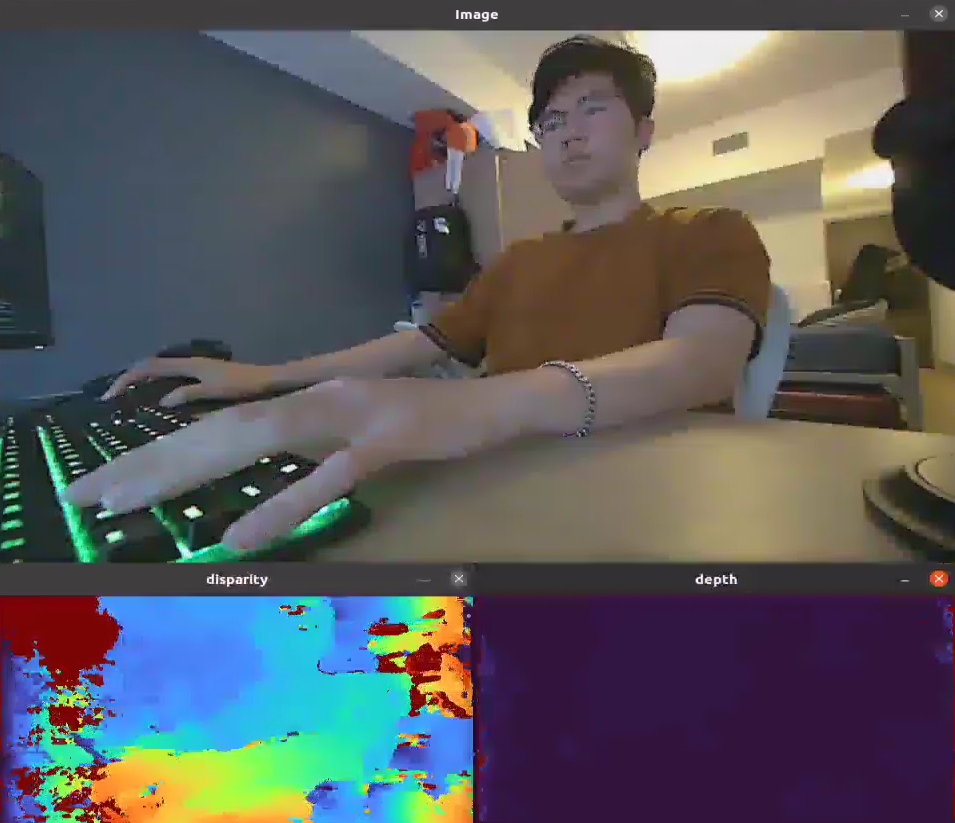
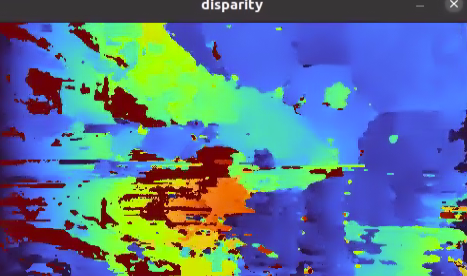
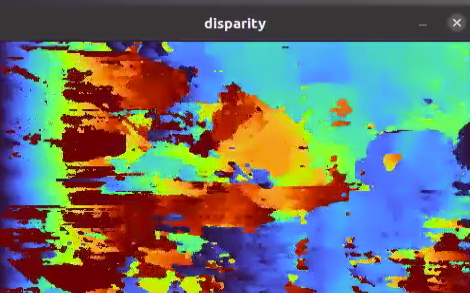
cv::bitwise_and(cv_disparity_color, cv_mask, cv_disparity_color);The depth image looks super sus and incorrect.
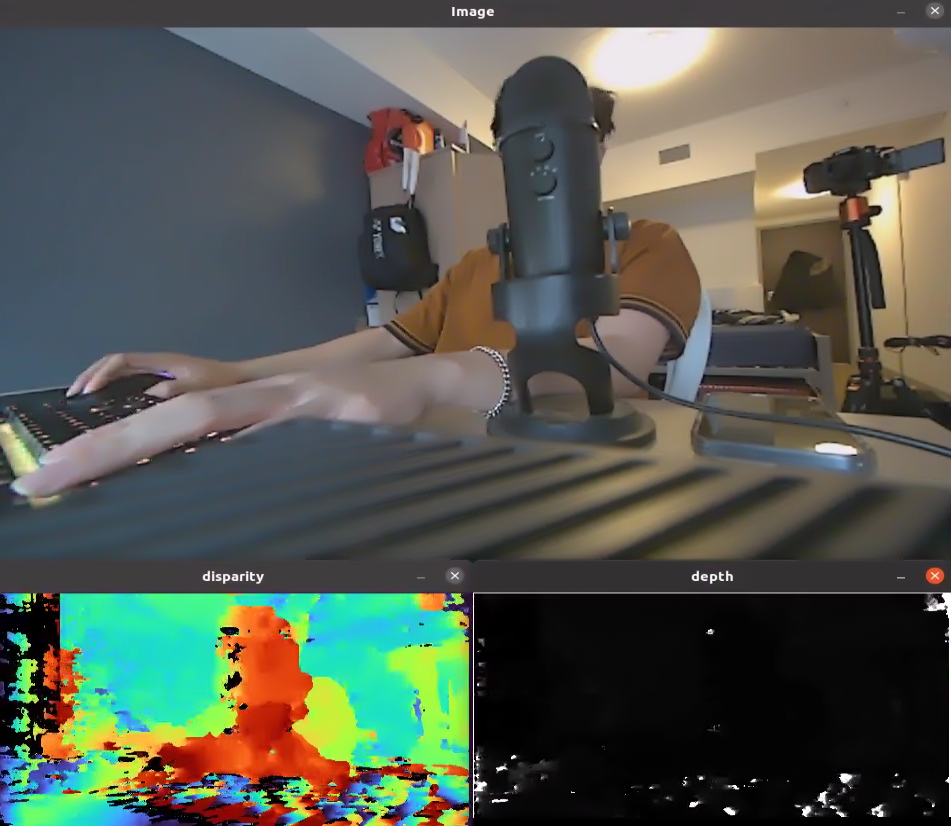
- The disparity image is not that good either
- Baseline and fx values were taken from the Zed Camera class
The black pixels in disparity are when the confidence for that area is 0. We don’t have to use it, here is what it would like like without thresholding

- So those values are very high
The default maxDisparity is 64

Using a maxDisparity = 128
- Runs at ~21hz
Using a maxDisparity = 256
- Runs ~19Hz
Why do the results get better as I increase the disparity?
- Because it has a wider area to search. But the input resolution is 480x270 anyways. Is it that bad when it is downscaling?
- It’s not like something is moving across the whole pixel.
The disparity represents the displacement of a given pixel. But in this case, maxDisparity isn’t exactly that.
- A larger
maxDisparityrange can better accommodate depth variations within the scene, making the algorithm more sensitive to objects at different distances. This can be particularly important in scenes with significant depth range or when objects are close to the camera, requiring a larger disparity for accurate depth calculation.
MaxDisparity of 128 vs 256: I am willing to sacrifice a little bit of performance for better results. So doing 256 by default.
- But seems like 256 sometimes actually gives worse results, because the search space is too big??
 The input resolution is 480x270
For 128
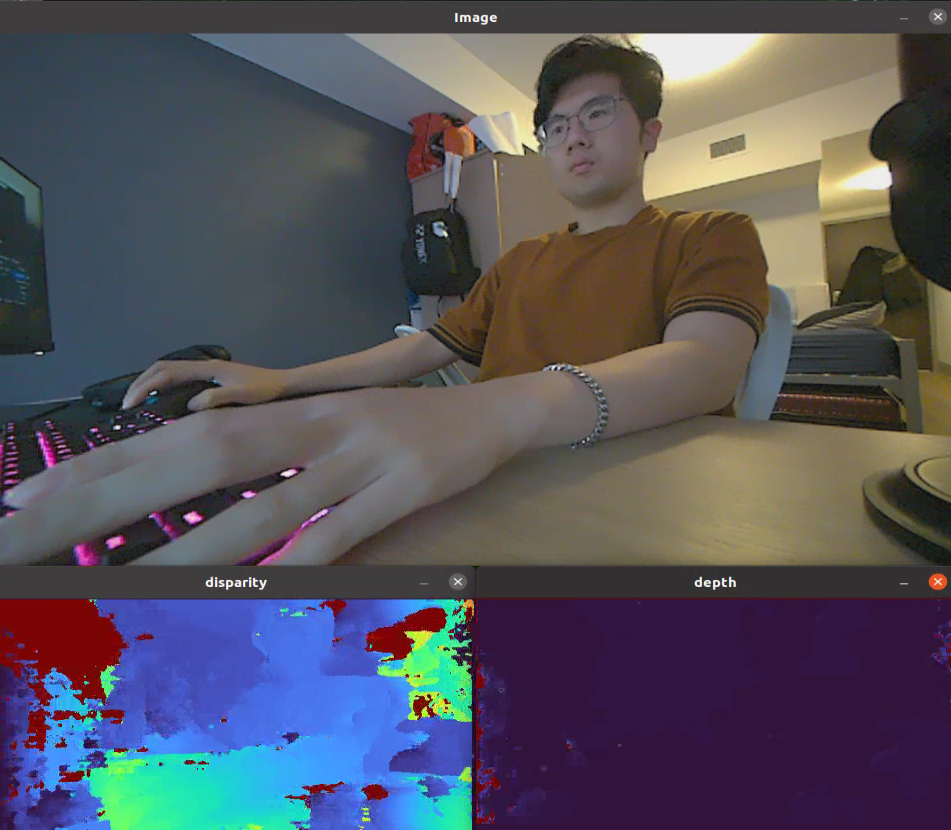
 However, computing the depth is still incorrect, I DONT GET IT. What is happening??
I’m stupid, I ran into this problem before. It’s more of a visualization problem than anything.
I’m actulaly confused at what is happenign, because 1 second the disparity image is really bad, and then I rebuilid it, and then its fine..??
2023-02-10
Omg it’s already Feb 10th.
Alright, so I just want to make sure about the interoperability with ZED. I don’t want lots of dependencies on the ZED. Need to make things GPU accelerated
It’s pretty cool that zed uses some pretty good code that enables data sharing.
    // To share data between sl::Mat and cv::Mat, use slMat2cvMat()
    // Only the headers and pointer to the sl::Mat are copied, not the data itself
    Mat image_zed(new_width, new_height, MAT_TYPE::U8_C4);
    cv::Mat image_ocv = slMat2cvMat(image_zed);
If you want to use runtime parameters, use
if (zed.grab(runtime_parameters) == sl::ERROR_CODE::SUCCESS) {However, I don’t need it, so I will just do zed.grab()
https://stackoverflow.com/questions/29273508/capturing-camera-image-with-v4l2-very-slow My old code used V4L2, which can be pretty slow.
Ideally, all the images are processed in GPU.
For the camera settings, I had this file, but I am thinking of removing it `
// Configure the calibration settings
class CameraParameters {
 public:
  cv::Mat K;  // Calibration Matrix (intrinsic parameters)
  cv::Mat D;  // Distortion Parameters

  void read(const cv::FileNode& node);
  void validate();
};

class StereoCameraParameters {
 public:
  CameraParameters left_params;
  CameraParameters right_params;
}
So the people at Zed actually store it in a very similar way: https://www.stereolabs.com/docs/api/structsl_1_1CalibrationParameters.html
- The calibrationparameters store the baseline, and then the intrisincis for both left and right
2024-02-05
Alright, Vision Pro got released. I need to ship this video by this weekend. Like actually hurry the F up.
I got my hands on a Zed Camera (Zed X Mini) thanks to Dave, will shout him out in video.
2024-02-02
Alright, so I drastically overlooked the speeds at which these cameras are going to take.
The camera was 640 x 240
320x240for each camera From first principles,
total number of bytes per second = 2 x 320 x 240 x 4 bytes x 30fps = 18.432 MB per second
- Therefore requires at least USB 3.0
This is still pretty bad resolution. For 360p, it’s 2 x 640 x 360 x 4 bytes x 30fps = 55.296 MB per second
720p
1280 x 720 pixels
2023-01-18
Spending lots of time just editing and telling the story of the VR Headset.
2023-01-16
So it’s been a whole month that I haven’t gotten to work on this. Finally am set up in my room.
So looking back a month ago, I did flash the Jetson with Jetpack 5.1.2, because I wanted the latest version of VPI. However, I had some difficulty and wasn’t able to install the SDK components.
I am now trying to install CUDA and VPI post-flash
https://forums.developer.nvidia.com/t/cuda-is-not-installed-on-jetson-orin/220661/3
For CUDA https://forums.developer.nvidia.com/t/cuda-is-not-installed-on-jetson-orin/220661
sudo apt install cuda-toolkit-11-4
For VPI https://forums.developer.nvidia.com/t/vpi-package-not-found/211056/2
sudo apt install nvidia-vpi
2023-12-14
Alright, I need to go all-in on this headset. No actually I need to go all-in on the self-driving car with MIT-PITT-RW ahhh.
I haven’t contributed much to the team. Need to do auto-calibration.
2023-12-04
Okay, I need to keep scripting. Cannot slack off.
2023-12-02
I get a cuda illegal memory access because the image that I am trying to access it too small.
cuda error /builds/cv/vpi/3rdparty/libSGM/src/device_buffer.hpp : 101 an illegal memory access was encountered
My stereo image is 640 x 240. However, if I use the larger image, I don’t run into this issue. Why?
I don’t undersatnd. Ah yes I underestand, it is due to this line
DisparityToDepthConverter disparity_to_depth{params.output_width, params.output_height, params.disparity_format};
- The default disparity format is
VPI_IMAGE_FORMAT_S16, so only 16 bits are allocated
Of course I get out of bounds error. I don’t know why I didn’t run into this error for a larger image??
But I still don’t understand.
2023-11-30
Using this dataset https://vision.middlebury.edu/stereo/data/ (na it’s dog-sh*t just use a random image, we don’t care about the actual images)
/** Stores the image plane contents. */
typedef struct VPIImageBufferPitchLinearRec
{
    /** Image format. */
    VPIImageFormat format;

    /** Number of planes.
     *  + Must be >= 1. */
    int32_t numPlanes;

    /** Data of all image planes in pitch-linear layout.
     *  + Only the first \ref numPlanes elements must have valid data. */
    VPIImagePlanePitchLinear planes[VPI_MAX_PLANE_COUNT];

} VPIImageBufferPitchLinear;- The number of planes represent the different channels
Kajanan showed me how to use cuda-gdb
sudo /usr/local/cuda/bin/cuda-gdb ./disparity_image
Then, run r. And then bt to backtrace
2023-11-28
Today, I’ve been trying to juggle with some design designs how to make disparity → depth → pointcloud work, since it isn’t quite interoeprable.
I need to be able to use a cuda kernel which takes in an image. Right now, I am directly working with a VPIImage, so it doesn’t quite work.
I was having an idea like this:
struct Image {
  VPIImage image;
  Image(int height, int height, VPIImageFormat format) {
    CudaMalloc2D(...);
    VPICreateImageWrapper(image);
  }
}
However, I am realizing that it’s adding unnecessary layers of abstraction, so for now, I will only do it for specific notes.
Another thing is that Kajanan showed me how he used the union to basically use aliases.
struct Example {
  union {
    int x{};
    int y;
  }
  union {
    int w{};
    int q;
  }
};- So he uses it for aliasing
widthandnumColsfor example.
So this is what I have so far
struct CUDAImage {
  float* data;
  int width;
  int height;
}
I am trying to figure out a way to have it interoperable with VPI.
Kajanan told me we have open source implementation
gxf::Expected<void> ImageWrapper::createFromVideoBuffer(
    const gxf::VideoBuffer& video_buffer, uint64_t flags) {
  nvidia::gxf::VideoBufferInfo image_info = video_buffer.video_frame_info();

  auto image_format = GXF_UNWRAP_OR_RETURN(vpi::VideoFormatToImageFormat(image_info.color_format));
  auto pixel_type = GXF_UNWRAP_OR_RETURN(vpi::VideoFormatToPixelType(image_info.color_format));

  image_data_.bufferType = VPI_IMAGE_BUFFER_CUDA_PITCH_LINEAR;
  image_data_.buffer.pitch.format = image_format;
  image_data_.buffer.pitch.numPlanes = 1;
  image_data_.buffer.pitch.planes[0].data = video_buffer.pointer();
  image_data_.buffer.pitch.planes[0].height = image_info.height;
  image_data_.buffer.pitch.planes[0].width = image_info.width;
  image_data_.buffer.pitch.planes[0].pixelType = pixel_type;
  image_data_.buffer.pitch.planes[0].pitchBytes = image_info.color_planes[0].stride;

  auto ret = vpiImageCreateWrapper(&image_data_, nullptr, flags, &image_);
So what is the .pointer() thing?
We need to look here: https://github.com/NVIDIA-ISAAC-ROS/gxf/blob/main/com_nvidia_gxf/gxf/multimedia/video.hpp
2023-11-22
I am in LA this weekend, but I am still trying to make some progress.
I want to try using Pangolin to render things in 3D.
- Implement Disparity to depth
Easy
-Implement depth to pointcloud node, and visualize it
2023-11-20
TODO:
- Implement a FeatureMatching thing based on the descriptors using FLANN..?
- Implement Disparity to pointcloud node, and visualize it
2023-11-19
Okay, there’s been super good progress, but I would like to keep going.
Specifically, I need to figure out
Okay, I finally get why there is multiple backends in a particular algorithm.
There is actually only one backend used for each algorithm, it’s just that disparity might actually require multiple backends, you just need to make sure that you have the hardware to support this.
One of the really interesting questions arize: Who owns each image? I think the input image should not be owned, but the output image should be owned.
So originally, I had
orb.ProcessFrame(cv_img_in, cv_img_out);This is really nice because it is just a simple function call, and the thing is self contained.
However, the problem becomes when there are things that are reused.
- Inside the function, the grayscale image is being used
Need to use like Barrier Synchronization.
I’m running into this problem of questioning whether I should use invididual classes.
So trying to understand what they are doing with the disparity estimator. Specifically, it seems that they are resizing for certain kinds of hardware.
 * @param[in] imageWidth, imageHeight Input image dimensions.
 *  Must be >= 0.
 *  On PVA, input dimensions must be 480x270.
 *  On PVA+NVENC+VIC, input dimensions must be 1920x1080.
 *  On OFA, input width and height must be between 16 and 16384 after applying downscaleFactor.
 *  On OFA+PVA+VIC (TEGRA), input width must be at least max(64, maxDisparity/downscaleFactor) * downscaleFactor.
I also finally understand how barrier synchronization works, it’s pretty cool.
2023-11-18
My program is much slower than the camera’s image feed rate, causing lag during the calibration process.
Found another memory leak program as I am using the VPI library.
You must first allocate the memory for the images, and then store them, else you get a bus error.
Bus error (core dumped)
One thing that I am baffled by is what is happening with the wrapper.
Memory leak
  vpiImageCreateWrapperOpenCVMat(cvImage, 0, &image);
  ...
  // vpiImageDestroy(image);
No memory leak
  vpiImageCreateWrapperOpenCVMat(cvImage, 0, &image);
  ...
  vpiImageDestroy(image);
I don’t get why I need to destroy the image.
- After further investigation, it seems that in this case,
imageis actually a wrapper, it doesn’t actually own the image. Therefore, when you callvpiImageDestroy, it doesn’t actually delete the memory under the hood
I want to directly give users the option to use the GPU image (VPIImage), instead of copying back to CPU.
2023-11-17
There’s been good progress, I have made a calibrationsettings.cpp file so it uses the parameters that I need.
Need to figure out why the camera is going cray cray for calibration.
Goal tomorrow is to add in the visual odometry solver.
2023-11-16
For now, I will skip VPI since I am on my MacBook, I will support both.
I am using OpenCV’s implementation of ORB, which has Keypoint + Descriptor
- Descriptor is 32-bit
Keypoints: 953
Descriptors: [32 x 953]

Make a class for:
CalibrationRectifierORB- Detection
- Tracking
Disparity(stores parameters like )
2023-11-14
Plan of attack to implement visual odometry:
- Get ORB from VPI
- Compute disparity between two images using SGM from VPI
- Use a solver to do least squares (Ceres Solver)
Other links
Originally, I was trying to write everything from scratch. I realized, however, that I have very limited time, and that even if I poured my blood, swear and tears into this project full-time, it would take months to complete.
I wanted to build every single piece of SLAM to appreciate the technical complexity being everything. If I simply used libraries, I won’t be able to explain to you why the pieces are hard.
However, I’m thinking about it more. I am an engineer that puts pieces together into 1 cohesive story.
- People spend years just refining a single piece of the puzzle
I will get more out of this by seeing the very high level view.
Think about the F1TENTH. You really didn’t write anything from scratch. But you got a really solid understanding of the high level.
This project goes down a layer of abstraction. But you can’t afford to go down to the lowest level and do EVERYTHING from scratch.
As you progress in your engineering journey, you will get to revisit some of these pieces and go more in depth. It is an iterative process.
Else, you will need to reduce the scope of the project. - Kajanan
2023-11-06
First iteration with the benchmarks, seems that my implementations are a LOT slower.

Command
./benchmark_test --benchmark_time_unit=ms
2023-11-01
What I think I want to do is write a wrapper class. I can’t inherit from an Eigen matrix, because their functions aren’t declared as virtual. I also can’t just use their plugins, because I
enum EigenDevice {
  CPU,
  CUDA,
  METAL,
}

class MatrixBase {
  public:
    EigenDevice device;
    operator+(MatrixBase other);
    ...
}
The difficulty in building Eigen is that some of the matrices are stack allocated, while others are heap allocated. How will you know where the data actually is?
Benchmarking
Once you write your own Eigen wrapper classes, then your thing is going to be a lot faster.
2023-10-31
There are 2 things I’d like to achieve today:
- Figure out how to benchmark in OpenCV, and more generally a general-purposed benchmarking system
- Figure out GPU acceleration
For GPU acceleration, approaches
- Use the Pytorch C++ library
- Build a wrapper around Eigen, and basically build it like pytorch
- There is support for using Eigen matrices inside cuda kernels, but you can’t do it with Metal
The problem is that C++ is a compiled language. So if you want to support multiple hardware accelerators, this is difficult to do out of the box, but there are a few solutions:
- Use Preprocessor macros + dlopen
- Inheritance + polymorphism, and wrap them in ifndef guards so no compile time errors https://chat.openai.com/c/6be7b7af-87e1-4ef2-b64a-30c43b0a5e81
HardwareAccelerator* accelerator;
if (is_gpu_available()) {
    accelerator = new GPUAccelerator();
} else {
    accelerator = new CPUAccelerator();
}
Look into the different backends that are available
So what I want to do is build an abstraction layer on top of Eigen, so that you can do hardware-accelerated operations, with support on various hardware.
- Take inspiration from George Hotz with tiny grad, only require the simplest operations to be implemented with the GPU
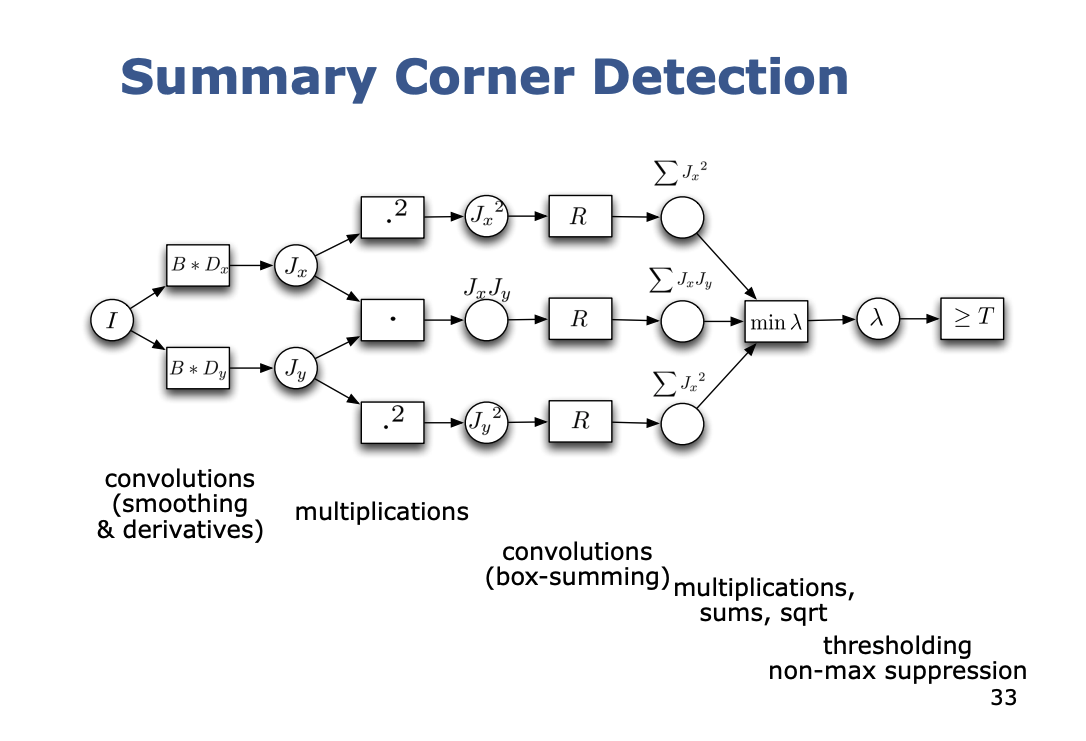
2023-10-30
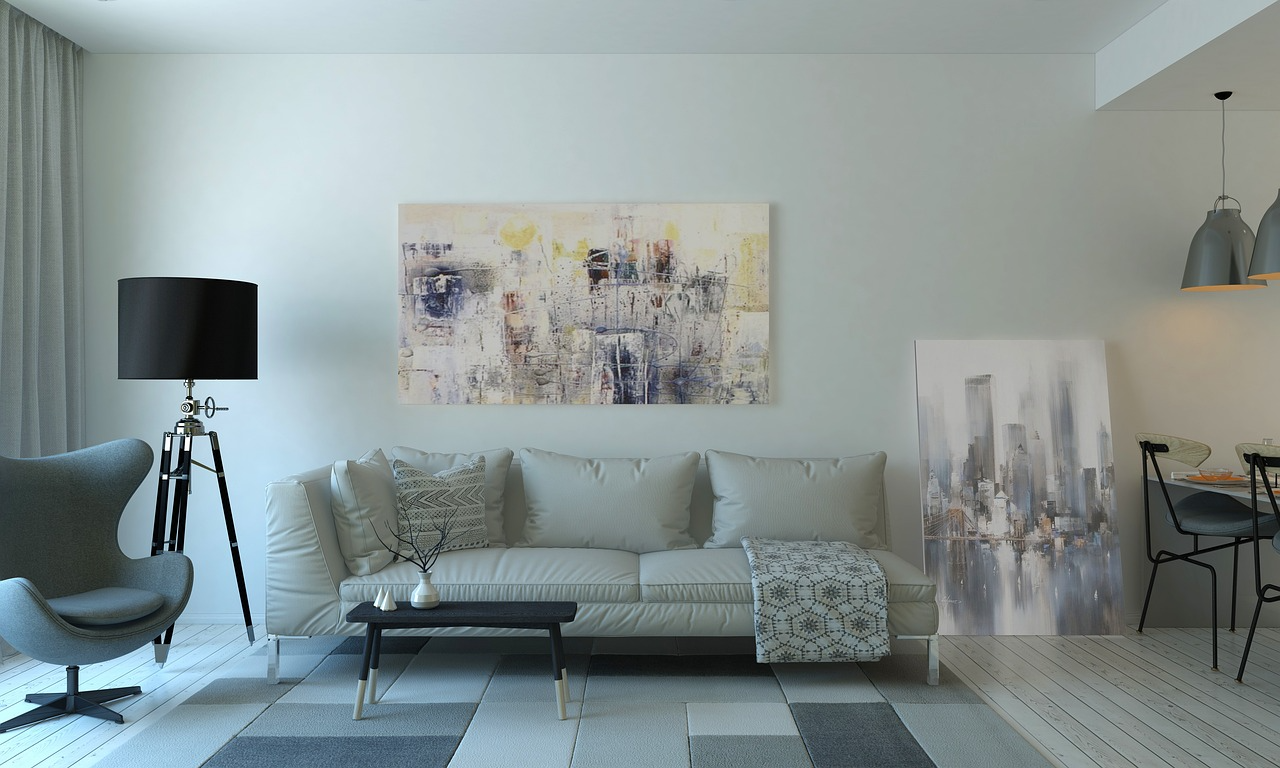
Key learning: Stay in double whenever possible
For Harris Corner detection, it is generally advisable to keep the result in floating-point (double or float) to preserve precision during intermediate calculations. Converting to unsigned char too early can result in loss of important details.
The difficulty is that for intermediate operations, you oftentimes want to keep as much data as possible, else you are going to lose information.
So I think switching everything to double makes sense. And always have the values normalized between values 0 and 1. The tradeoff is that you have more overhead with doubles, but you can more precise values.
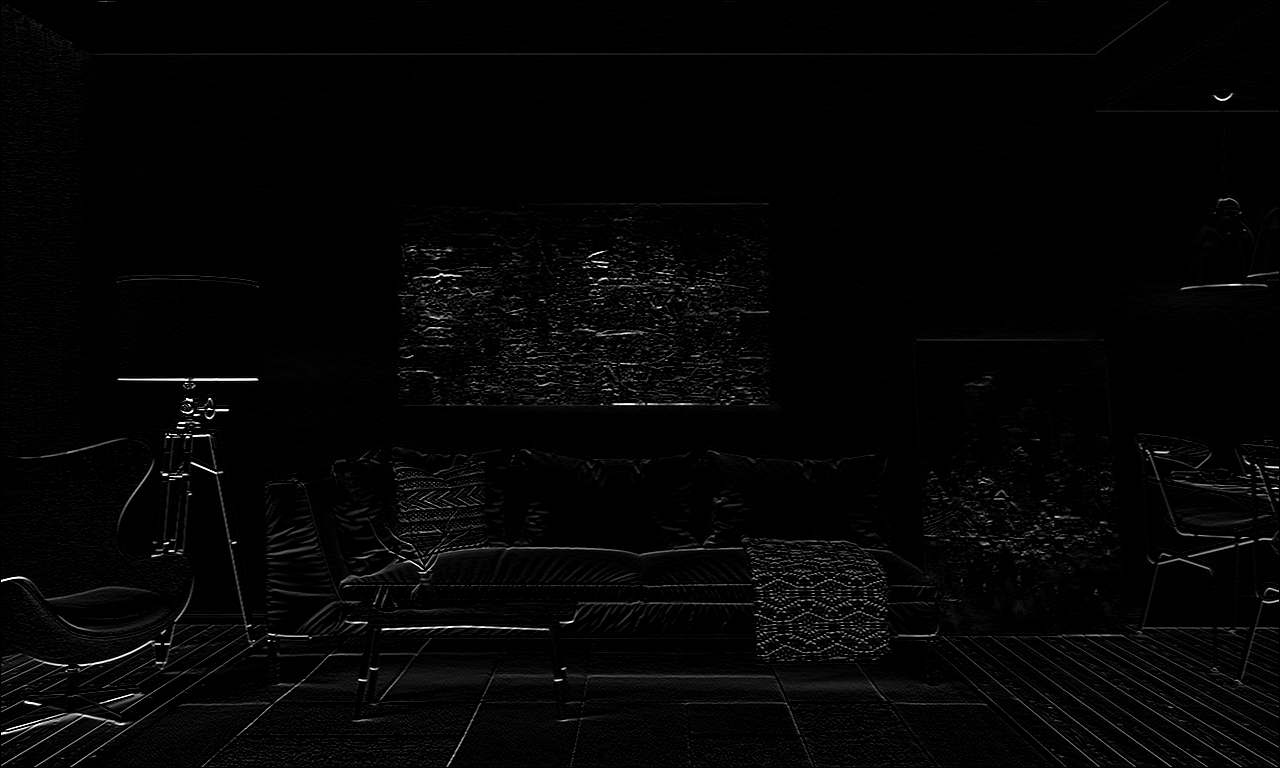
This is what I get using doubles instead, and I don’t apply normalization anymore
If I normalize, the values become so small that you can’t even see the features anymore. Also, I need to save it to disk.
Eigen seems to use column major indexing, while OpenCV with their
cv::Matuses row major indexing.FALSE: They use column-major STORAGE, not indexing.
See more https://stackoverflow.com/questions/14783329/opencv-cvmat-and-eigenmatrix
Ummm nooo, this is wrong? In the getting started guide https://eigen.tuxfamily.org/dox/GettingStarted.html
#include <iostream>
#include <Eigen/Dense>

using Eigen::MatrixXd;

int main()
{
  MatrixXd m(2,2);
  m(0,0) = 3;
  m(1,0) = 2.5;
  m(0,1) = -1;
  m(1,1) = m(1,0) + m(0,1);
  std::cout << m << std::endl;
}
This prints out
 3  -1
2.5 1.5
The issue was actually that I was using the wrong kernels,
const double kSobelDxArray[] = {-1, 0, 1, -2, 0, 2, -1, 0, 1};
const Kernel3x3 kSobelDx(kSobelDxArray);
If you print kSobelDx, you actually get
-1 -2 -1
 0  0  0
1 2 1- So it stores it in a column wise order https://stackoverflow.com/questions/25999407/initialize-a-constant-eigen-matrix-in-a-header-file
My fix: Move this to use comma initialization, which is row major.
I learned that some compilers allow usage of features from newer C++ standards even when an older standard is specified. However, this is not portable behavior and may produce warnings or errors on different compilers or setups.
I was using inline variables compiled with C++11, even though that standard was only introduced in C++17.
I think I am running into the Vanishing Gradient when I am computing these gradients.
- Ahh, it’s because I take the absolute value, when I should really just take the sum. But I don’t understand where the values come from then
There’s some really cool stuff:
In the Eigen library, the operator() function is overloaded to allow both read and write access. This is different from a pure const method, which would only allow read access.
// Inside Eigen::Matrix class
template<typename Scalar, int Rows, int Cols>
class Matrix {
public:
  // For read access (const)
  const Scalar& operator()(int row, int col) const {
    return data[row * Cols + col];
  }

  // For write access (non-const)
  Scalar& operator()(int row, int col) {
    return data[row * Cols + col];
  }
  // ...
};
For some reason, I am getting negative eigenvalues. It seems that these negative values should never arise.
- This is due to
2023-10-29
Alright, I consulted with Kajanan, and he said that I should just focus on drawing things on the image first, to visualize how things work.
So I have an image, and I want to draw on top of it after detecting corners.
I want to start with simple corner extraction, see Keypoint.
Kajanan raised some good points about using Enums. However, it’s a bit overwhelming at the moment, I just want to see my feature detectors work. I need to figure out how to do my convolution operations.
TODO:
- Figure out the correct normalization factor for the Sobel operators
- Figure out the padding for these convolutions
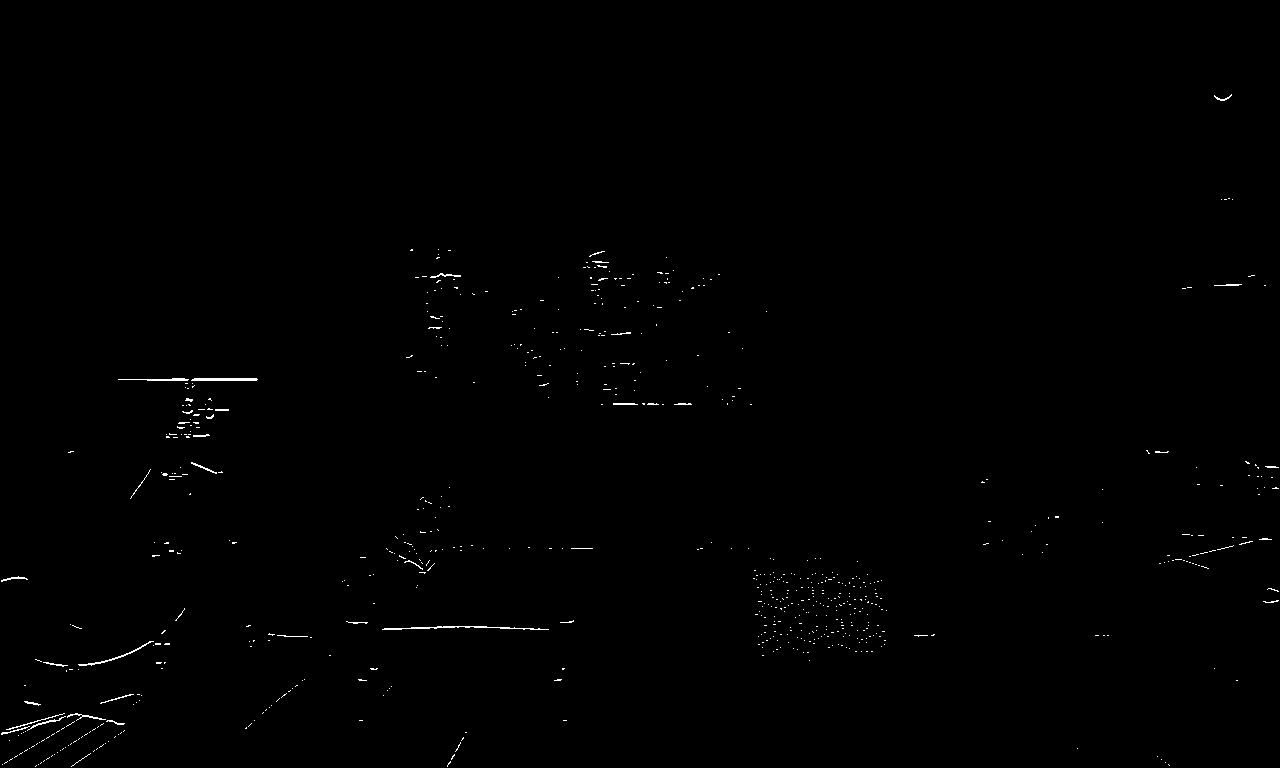
Applying the sobel operator

- This is with a normalization factor of 8
- Normalization factor of 2: so you can see that the edges are more prominent
2023-10-22
Still trying to figure out how to write out the entire SLAM system.
Specifically, the part about visual odometry, and how once you detect the features in 2 different frames, how you can estimate the movement of the camera
- i.e. the local mapping part of ORB-SLAM
I need to get a better understanding of this system to design out my code for writing SLAM from scratch.
2023-10-21
Alright, I am back on the VR headset grind. I spent the last 2 weeks getting a better foundation by going through Cyrill Stachniss’ lectures on photogrammetry.

2023-09-17
Alright, I need to think pretty hard about how to go about detecting FAST features. I know at a conceptual level how it work, but I don’t know how to implement it in a way that makes it run super fast.
Like I would compare each pixel one by one in the circular radius, and then check that they are all below or above the threshold. And they talk about how they check certain pixels first. This is a lot of if statements.
- ChatGPT says that I can’t use Convolution because FAST is non-linear.
2023-08-28
Alright, coming back from the Denmark trip, really need to focus on shipping. Now, I also got the VR headset.
I want to build SLAM from scratch. And really from scratch. Which means tracking the features. Do NOT rely on the SLAM textbook, since they already provide the code. Instead, come up with your own implementation, which includes:
- Feature detection
And the best way to implement those to read up the original papers and try implementing them.
- Don’t waste time trying to just use other people’s code
What I do need to investigate is:
- What are the best techniques for feature detection? I mean, ORB is very well known, but it seems quite old. New learning-based methods good? I say do both?
Use direct method? p.204 of SLAM book, “dense direct method” which combines power of GPU.
2023-06-29
Design Doc
Okay, let me write down specifically the features that I need on this VR Headset so that it is like the Apple Vision Pro. Design Document
Usually, I would brainstorm on my own before looking at what other people have done, but here really I just want to build a replica of the Vision Pro.
Requirements I probably won’t mention these in the video, but they are the features that I need.
- Needs to look good and futuristic just like Apple’s (scuba diving goggles)
- Lightweight headset
- How light is light? See apple’s weight
- Inside out with SLAM and 6DOF tracking (camera + IMU)
- See through ability
- Low latency (~20 ms)
- (later down the line) Hand tracking with camera, you can tap your fingers and it knows that you clicked
- (later down the line) Eye tracking so there is a display that looks at your eyes
- Actually FEEL like a VR Headset (not just a sh-tty display that you would wear for 1 min)
Okay, based on these requirements, let’s research what sensors we need:
- Cameras:
- Needed for SLAM + immersion
- Wondering here
- Eye Tracking (done using IR cameras + LEDs)
- Needed for SLAM + immersion
- IMU
- Needed to help more reliable odometry
here’s my plan:
- Design the hardware and get that out of the way so it comes in like 3-weeks
- During this time period, grind out the software design of the headset
Spatial Audio system
- Match sound to your space
And so I was searching for all these really sensors _show Intel Realsense price (500$). Use Vine Boom sound effect. _
2023-06-30
Some cameras:
The technology:
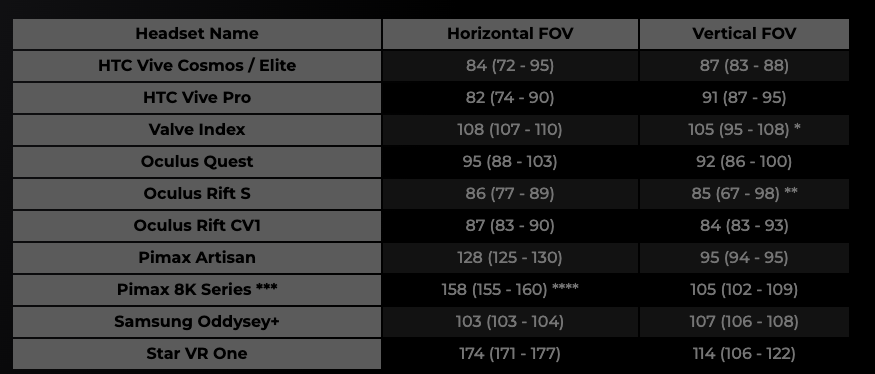
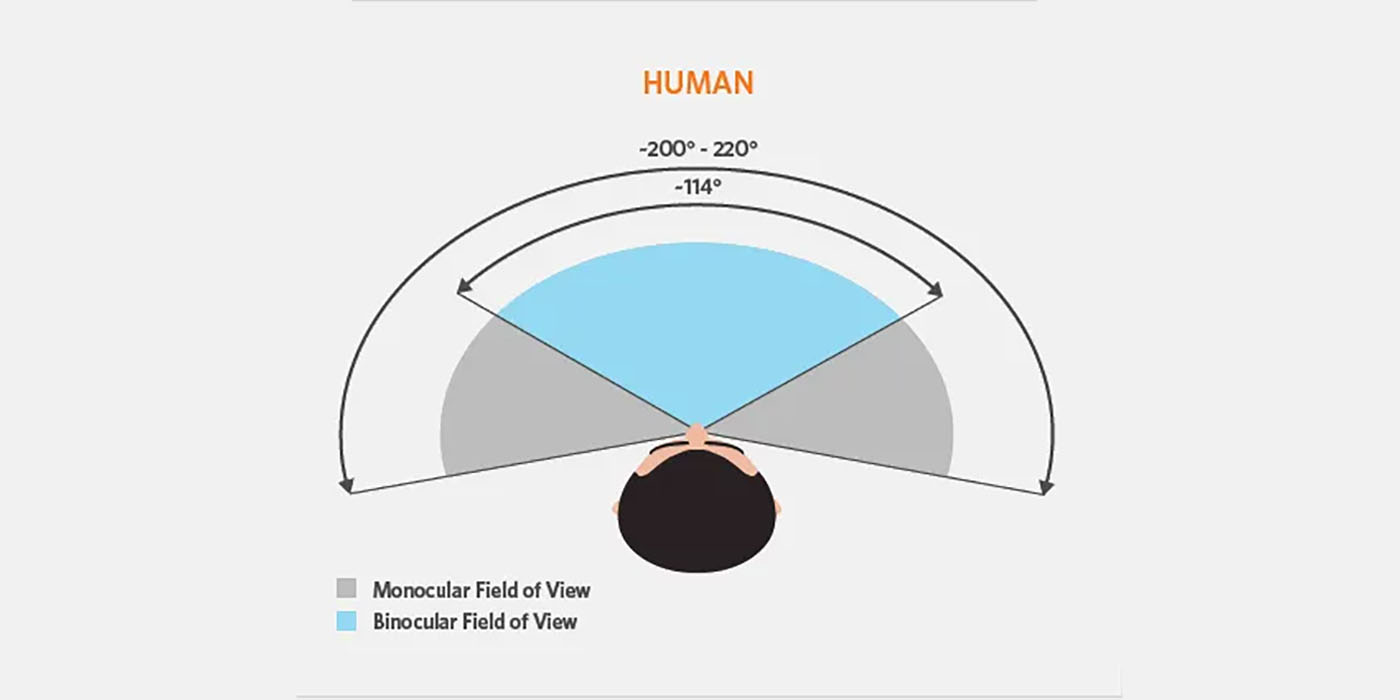
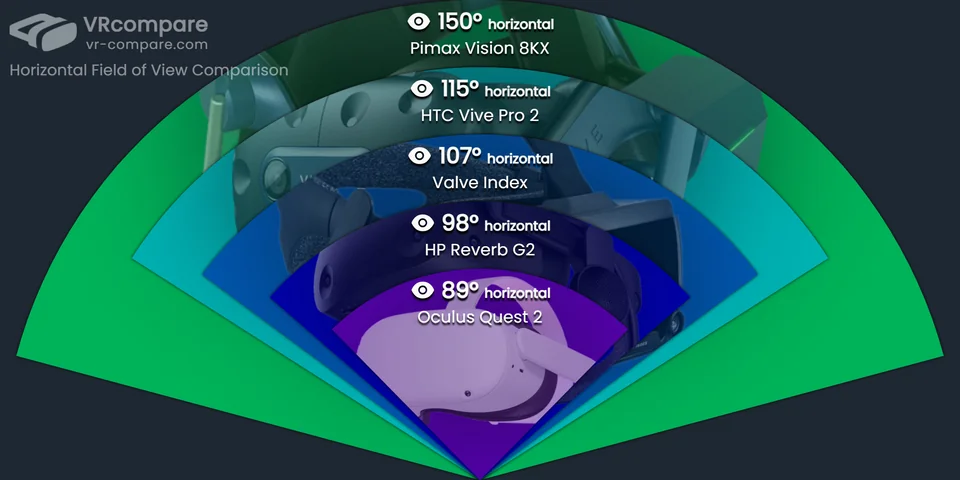
https://www.infinite.cz/blog/VR-Field-of-View-measured-explained
Camera specs for Robotics
I should figure this out by tomorrow. And I should film this video Was looking at this camera for example,
5 mm lens..? What does that mean again?
- I know that the greater, the more cropped in?
ELP-USBFHD06H-L21(2.1mm) ELP-USBFHD06H-L28(2.8mm) ELP-USBFHD06H-L36(3.6mm) ELP-USBFHD06H-L60(6mm) ELP-USBFHD06H-L80(8mm) ELP-USBFHD06H-L12(12mm) ELP-USBFHD06H-L170(Fisheye lens) ELP-USBFHD06H-L180(Fisheye lens) ELP-USBFHD06H-L100 (No distortion lens HFOV 80 degree VFOV 48 degree) ELP-USBFHD06H-H100 (No distortion lens HFOV 95 degree VFOV 62 degree) ELP-USBFHD06H-H110 (No distortion lens HFOV 109 degree VFOV 72 degree) ELP-USBFHD06H-H120 (No distortion lens HFOV 120 degree VFOV 82 degree)
Types of Lens
Going through the specifications to make sure I get the right camera, there are a few terminologies that I don’t understand
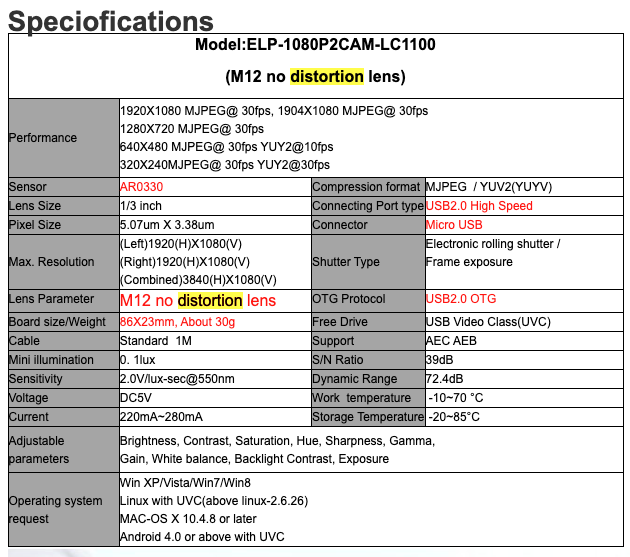
- Mini Illumination amount of light to make image usable
- S/N ratio Measure of the level of desired signal compared to the level of background noise present in the captured image. A higher S/N ratio indicates a clearer and less noisy image.
- Dynamic Range represents the range of light intensities that a camera can capture accurately. It is the difference between the brightest and darkest parts of an image that can be captured without losing details
- Sensor / Lens Size Sensor size is typically represented as a fraction, where the larger the denominator, the smaller the physical size of the sensor. A smaller sensor size can impact factors such as low-light performance, depth of field, and image quality
So before I go deeper, I need to better understand what cameras are actually used to do SLAM on a VR headset. What is a good field of view that one should use?
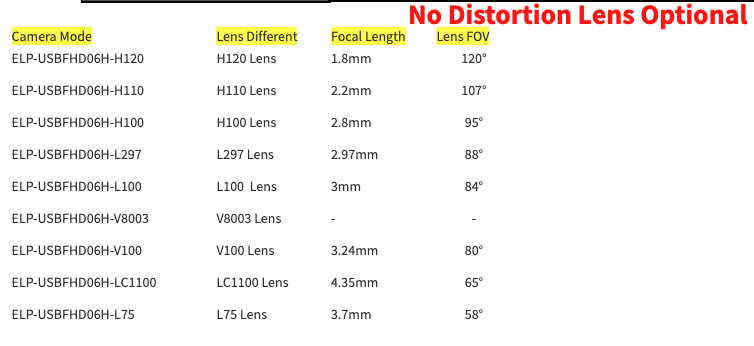
Alright, so I got in touch with the Sales Manager of ELP Ms. Lizzy Liu(Sales Manager) info found here, offering to give them a shoutout if they ship me the product. That will be great.
She clarified that this is the newest camera out of their line that is coming out:
And I should get the H120 version, because that has the widest FOV, without being fisheye, though there is some slight distortion.
In terms of the IMU, The orin has GPIO pins. How can I transmit this over long wires…?